Tuesday, December 30, 2014

Yarn bombing at the de Young

The de Young Museum in San Francisco's Golden Gate Park is featuring some fiber art by the artist known as Streetcolor. The exhibit is called "Streetcoloring at the de Young" and runs through January 4. The exhibit features yarn bombing throughout the museum and its surrounds. Here are the decorated bike racks outside the entrance.

The poles around the ticket lines are decorated.

There is an exhibit of her felting art in one of the galleries. She is doing felting on the premises and there are times available when you ask her about her work. Here's a display of some of her pieces.

There was a crowd knitting event on Dec 6, but I didn't know about the exhibit until recently. It's ending soon, so if you're in the area, check it out!

Friday, December 26, 2014

FO: Germander shrug

This the Germander Shrug from Graphic Knits. The yarn is the now discontinued Sublime Yarns Organic Merino DK. I wanted to knit this shrug mainly because I liked the stitch pattern on the back. Also, I didn't have enough of the yarn in my stash for a full cardigan so I thought this pattern would be great for it. The yarn knits more like a worsted weight instead of DK weight. As with many shrugs, the front isn't very exciting.

I don't know that I love this shrug, but I generally don't love shrugs that much because they look a bit odd in the back for my taste and they don't cover enough in the front. This pattern has an interesting construction which makes the sleeves start really low on the arms so it feels like the shrug is being pulled off by the sleeves. I do like the stitch pattern and the yarn feels very luxurious, so I'll probably get some wear out of it come spring when I just need a bit of warmth around my neck and back.

Saturday, November 15, 2014

FO: Buds and Blooms

I recently finished knitting Buds and Blooms from Botanical Knits. My yarn is the discontinued Cascade Cash Vero. I was attracted to this sweater mainly because of the pockets, but I do like the detailed back and the shape of the collar. The collar has an interesting construction at the top of the button band that makes it fold over very nicely. I was dubious because the collar stitches are picked up on the wrong side of the body but the collar folds high enough such that you don't see the ridge where the stitches were picked up.

I made some sizing adjustments, as I usually do. I made mine a bit longer and I put in waist shaping. I also narrowed the shoulders a bit. I used my own sizing for the sleeves since I like narrow sleeves. I knitted this yarn at the looser end of the recommended gauge range so the sweater is a bit on the floppy side. It's probably just as well since it needs the drape to avoid looking too large. Also, the collar needs to be fairly soft in order to lay flat nicely. I did use needles 3 sizes smaller for the button bands to make them a denser fabric.

The pockets have an interesting construction, and they did come out very nicely.

Saturday, October 18, 2014

Accessories

News flash! I knitted a shawl! If you have read this blog for a while or looked through my ravelry projects, you'll know that I never knitted a shawl before. I never really want to wear a shawl - I just prefer to wear a sweater because I don't have to fuss with it staying on my shoulders a certain way, or whatever. I took a short trip to Carmel-by-the-sea not too long ago and while there, paid a visit to Knitting by the Sea as I always do. The shop had on display a sample shawl knitted with Fame trend paljett yarn. This yarn is threaded with small sequins and I was attracted to the bling, sort of like birds attracted to bright shiny things. One shawl only takes one ball of yarn, and the shop provides the pattern with a yarn purchase. It's really a simple shawl knit in garter stitch with a YO increase at the start of every row. I really do like the bling and I'm amazed how warm it feels for such a lightweight piece that is only 55% wool.

I seem to be on an accessories roll since I also knitted up a long cowl, using up some Sublime merino wool in my stash. I wanted to knit a lengthwise cowl and just stop when it felt long enough. I just sewed the ends together.

The pattern is a simple lacy rib adapted from some sweater pattern or another. The lace pattern is 4 stitches:

  • Row 1: K2 YO K2tog
  • Row 2: P
  • Row 3: SSK YO K2
  • Row 4: P
I separated the lace pattern with 2 purl stitches, and used a garter stitch border.

Friday, October 10, 2014

I've been re-published!

Not too long ago, Knitscene published my one and probably only knitting pattern. It's the Manganese Cowl and it's a fairly simple knit. They decided to re-publish the pattern in this new Make it! Knits magazine which is targeted for the beginning knitter and sold in big box stores. Here's my pattern in all it's glory:

The magazine features mainly accessories and all the yarns are worsted weight or higher for quick knitting. Many of the pieces would be great for quick holiday gifts. I'll probably knit one of two of the cowl patterns, such as the Leadville Cowl and/or the Serpentine Cowl.

Tuesday, September 23, 2014

Sewing FO: Vogue patterns v1313

This dress is from Vogue patterns V1313 and I absolutely love it. My print fabric is a textured cotton/poly knit and the black contrast is a smooth poly/rayon knit with small flocking dots. Both were purchased from Jo-Ann. I omitted a couple of details in the pattern. I didn't bother with the fleece interfacing and the quilting stitches on the shoulder pieces. I also skipped the front pockets because my fabric is a very soft knit and I didn't think I could sew those pockets perfectly so as not to ruin the smooth line of the lower front section.

The pattern says it is a semi-fitted dress, but it is sized larger than I expected. It's a little more difficult to alter because of the lack of side seams. In order to narrow in the sides, I had to rip out the side panels, cut back the front and back sections, and then sew it back together. I couldn't just sew wider seams because that would make the side panels too narrow. It's just as well that I didn't do the pockets because if I had, I would have given up entirely because of the difficulty of alterations. In addition to narrowing the front and back pieces, I cut them in more at the waist line to give a little more shape to the dress. I also added a small vertical dart at the top of each side panel. The alterations took a bit of work but I love the end result. \

The pattern calls for a 16" separating zipper but I used an 18" one. I think 16" is just a bit too short. Mine is a bit long but I only have about an inch of the zipper bottom extending below and that's fine. I thought about using a metal zipper but they just seem way too heavy so I went with plastic.

I really admire bloggers who get fully dressed and styled to show off their outfits. I managed to don black hosiery for this, but that's about all I could muster. My photos never show my feet because I'm probably wearing slippers!

Thursday, September 11, 2014

FO: Pleated Elliptical Cardigan

I just finished the Pleated Elliptical Cardigan. My yarn is Elsebeth Lavold Silky Wool. It's knit at a looser gauge than the recommended gauge for the yarn to give the sweater a really nice drape. The sweater is a bed jacket style, with a modern curved hem. It's quite long in the back -- I could have made it an inch shorter all around and it would have been fine. The fit is really loose and I didn't like it when I first tried it on, but then I discovered what wonders a shawl pin can do.

I didn't really make any size modifications but I decided to eliminate the front pleats at the last minute and just gather the stitches. I thought that the front pleats might poke out too much at the bust line for my particular body type. The gathers aren't really visible, but the fronts have a smooth drape as a result. I kept the back pleat. I used a crochet hook and added a row of slip stitches around the back and shoulders neckline to keep it tighter and prevent stretching. The sweater has an interesting saddle shoulder construction but I'm hoping the shoulders won't stretch too much with wear because there's no sturdy seam to keep everything held in place. Overall, I'm pleased with how this turned out.

Thursday, August 21, 2014

Sewing FO: Vogue V1348 It's all about the petticoat

This dress is sewn from Vogue patterns V1348. I love the print of this fabric. It reminds of either (1) an abstract painting, (2) a child's finger painting project, or (3) a house painter's well used drop cloth. It's also 100% linen, which I love. The skirt lining consists of two tiers of ruffles, which forms a petticoat. I decided that since it has a petticoat, I might as well let it show at the hem. Instead of using a narrow hem for the bottom tier, I cut it twice as high and folded it for a double layer. It's cut from as very light weight lawn cotton, as is the rest of the lining. The pattern calls for underlining the bodice pieces, but I skipped that since my linen is a medium weight and I didn't want any more thickness. The underlining is also used to tack down the top edges of the pleats, but the dress is fine without the tacking.

Now all I need a is a great summer party to wear this to -- too bad summer is almost over!

Thursday, August 7, 2014

Sewing FO: Butterick B5347

This a great easy-wearing summer dress from Butterick B5347. This is view A using two neckline buttons instead of one and using my own pocket design. The fabric is a medium weight cotton with some lycra for a bit of stretch. Because it stretches, I can pull the dress over my head easily so I omitted the back zipper -- woo-hoo! I wanted something more exciting than square patch pockets so I came up with this angled and pleated pocket and the pleat is held in place by a button, sort of echoing the front neckline. The dress is unlined so it's great for hot weather.

The trickiest part of this dress is getting the front pleat just so. The amount and angle of the fold is sort of body specific -- you have to try the dress on and keeping pinning the pleat until you like how everything drapes. I used two buttons because I found that the extra button keeps the front tucked in a little better. This is actually the third rendition of this pattern. I made the first dress in pure cotton and a second dressy version in silk. Both of the those have the cap sleeves and for the dressy one I used three front buttons to give it even more shaping.

Tuesday, July 29, 2014

Is it Instagram-worthy?

For some unknown reason, I've recently jumped onto the Instagram bandwagon. I've set myself a challenge to see if I can find at least one photo to post everyday on Instagram. I'm using both new photos, mainly taken using my phone, and old photos from my stash. I haven't set an end date for this exercise, so I'll have to see how long it takes before I'm bored.

The one thing this has done for me is to make me more aware of my surroundings. I'm now looking around more for things that are interesting or different or pretty, or whatever. I'm always asking myself, "Is it Instagram-worthy?" Anyway, you can follow me on Instagram. Other than the occasional finished knitwear and my feet in shoes, I promise not to bore you with the ever-annoying selfie!

Friday, July 25, 2014

FO: Alison Pullover

This is Alison Pullover from Knitscene Fall 2013. This is a classic fitted pullover. My yarn is 2nd Time Cotton from Knit One, Crochet Too. The pattern calls for a wool/alpaca yarn but I decided to use a cotton blend and also make short sleeves. I knitted the sweater as flat pieces, and I used reverse stockinette for the yoke instead of garter stitch. I used stockinette instead of garter for the sleeves.

I made my neckline a bit higher and rounder in the front, and I finished the neck and front edge with a row of single crochet followed by a row of reverse single crochet. I omitted the buttonholes so the buttons are just decorative. Even though the sweater is knitted with a cotton yarn, it's still too warm to wear in the middle of summer because of the thickness of the yarn and resulting sweater.

Thursday, July 17, 2014

Sewing FO: V1387 - The Sleeveless Version

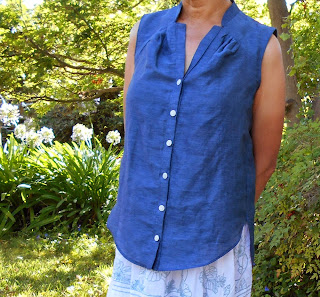
This is a shirt from Vogue Patterns V1387. I made this hipster plaid shirt not too long ago using the same pattern. I kept seeing all these sleeveless shirts in the stores and decided I should make one. I figured this pattern could be easily adapted to be a sleeveless shirt. Plus, I had this leftover silk/linen fabric that would be perfect for it. The fabric is great -- it is really lightweight but crisp and has a slight sheen to it. The crispiness does make the front pleats bubble out a bit, but I'm good with that. The shirt will probably soften after a few washings.

I used a narrow folded bias strip as a facing for the armholes. I did have to cut in the armholes a bit, especially on the back side. You can't see it in the photos, but the buttons each have a tiny rhinestone in the center for that added bit of bling.

This is actually the third shirt from the same pattern, so I really like it. The second one has sleeves like the first and is sewn from a white-on-white striped cotton. It's not the fastest shirt to sew -- the front yoke section along with the narrow collar and front band require some careful workmanship. The bottom edges are curved narrow hems. Finally, in order to keep things tidy, it's best to use french seams on the sides. The one detail that I didn't like about the pattern is that it leaves a bit of raw fabric at the corner where the collar and front band meet. For this shirt and the one prior, I sewed a small square onto the corner with stitches that turn at about a 100 degree angle. I clipped to the corner and turned the square to the inside. This leaves me with a strongly reinforced corner and no raw edge exposed.

Sunday, June 1, 2014

FO: Gyre Cardigan

This is the Gyre Cardigan knitted with Valley Yarns Stockbridge, a merino and alpaca blend. I liked this pattern when I first saw it because it has a hippy-dippy 70s vibe to it. After I looked at some of the finished ones on ravelry I decided that perhaps it was a bit too much hippy-dippy. Also, several knitters said that the garment is really voluminous. The back sections looked a little too lumpy to me because of the changing gauge with the different stitch patterns and the large number of stitches increased after the dropped stitches. I decided to simplify things by not doing any increases after the dropped stitch section and just do stockinette. I used a border of broken rib at the bottom and also for the armhole bands. I shortened the dropped stitch section to 5 inches from 7 which reduces some of the hippy-dippyness. Finally, I made it at least 4 inches shorter than the pattern's length. The finished sweater is still a bit too large but the shawl pin holds it in really nicely, so I'm very happy with it.

To give the front edges a more finished look, I added a couple of stitches to each side and slipped the first and last 2 knit stitches on every knit row to give it a quasi I-cord look.

Tuesday, April 15, 2014

FO: Effervescence cardigan

This is the Effervescence cardigan, knitted with Araucania Ranco solid, a merino/nylon blend. I really like this yarn and I'm sad that it's been discontinued. I bought this pattern because I liked the front stitch design. The rest of it is a basic fitted cardigan, so I sized and shaped it to my liking. I made bracelet length sleeves and I think my shoulder section is a bit wider.

I converted this to knit as flat pieces, and I'm glad I did. The stitch pattern pulls in and narrows the gauge. After knitting about 3/4 of the first front piece, I discovered that it was just too narrow at the bust line. I re-knitted it about an inch wider. I normally like to knit the fronts of a cardigan wider than the back anyway, but this pattern needs even more extra width. If I had knitted in the round, I would have needed to re-do all or most of the cardigan in order to add in that extra width.

I knitted the front button bands using needles three sizes smaller in order to get a denser fabric. The gauge of the front button bands is 8 stitches/inch and the rest of the sweater is 6 stitches/inch. Here's my tip for the K1-P1 band: I knit the first and last stitches of the band as K2. That way, the edge knit stitches roll under a bit and you get a nice edge on the band.

Sunday, March 30, 2014

Sewing FO; Vogue Patterns V1382

This is a dress from Vogue Patterns V1382 and it's going to be a fun dress for spring and summer. The pattern is shown as a color-blocked dress, but I just used one fabric. In fact, I think I've sewn at least two other color-blocked patterns recently using one fabric only. I used a stretch cotton sateen but the stretch was not necessary because the pattern has plenty of ease. The lining is a lawn cotton. I wanted to do something that would show some of the lines of the dress, so I sewed on twill ribbon at the base of the yoke. I also used the ribbon on the pockets to give them more emphasis. I lined the pockets and top stitched them on instead of just folding in and slip stitching. The dress has a vague retro vibe to it which I love.

Sunday, March 23, 2014

Scenes from a flower show

On Friday, I visited the San Francisco Flower and Garden Show. I had never been before but I've always wanted to check it out. It was an amusing way to spend a couple of hours. Here's the first scene that I saw upon entry.

This was one of my favorite vendors. This guy sells these distressed looking metal letters of varying sizes. I so wanted to buy something but I just couldn't think of a use for them. He doesn't sell online, unfortunately.

I did buy a rectangular basket made in Morocco from my favorite basket vendor. The shop is named "Asylum Down" (love the name) and it's located in Nevada City, CA. I bought one these last year when she came to the Sunset Magazine Celebration Weekend, and the basket is great for grocery shopping. She also does not sell online.

The best part of this show are all display gardens done by various landscape architects. The show is only on for five days, and I wonder how long it takes some of them to set their gardens up. This one included The Nautilove as its centerpiece.

I'm not sure what the pink "tent" is, but it's eye-catching

The round center area is made of overturned empty wine bottles

This is a water feature made of a tightly wound hose or two that has lit sections. It's hard to see, but there's water squirting out of two ends.

This garden has a pre-historic vibe.

I'm not sure this is my style.

Every garden needs a water wheel.

I sort of like this. It's the dome above the wine bottle pathway shown above.

And every garden show has to have a bonsai exhibit.